|
What I learned about this video is we have the same type of skin as armadillos, roosters, and many other animals, except their scales are a lot thicker than ours. Also the skin/scales on our body regenerate very fast, every second around 500 skin cells break apart from the stem cells and go to the surface of our skin. Our skin is made from keratin which is the same things most animals scales are made of, ours are much thinner but it's still the same thing. Our brain is what tells our bodies regenerate new skin cells so quickly. The significance of this video is skin is on our body, and it protects us from the harsh things in the world, and it’s important to learn about it. It is also significant because it shows that people aren’t very different from animals, and this is another connection we have. A few questions I have is what would happen if we didn’t have skin? How would our insides react? We would just all get sick and die quickly? Down below is the video I watched Looking Back: What Happened? For this experiment I was working with Elyse and Savreen and we made soda that was root beer flavored. Elyse had already made soda once so she was able to really help Savreen and I during the process. After the soda had sat for six days we opened it up hoping it would be carbonated, and unfortunately it wasn't, the soda was flat and very sweet. The reason why our soda turned out this way is because we had inactive yeast, so our soda turned out to be just all flavoring. Looking Beyond: What's the Science? The whole reason our soda didn't carbonate is because of the yeast being inactive, this is what the yeast should have done, if we had gotten a good batch. Yeast is a fungi that is singularly celled, the scientific name is Saccharomyces Cerevisiae which means "sugar eating fungus." Yeast acquires energy from sugar molecules by breaking them down, in order to do this yeast needs oxygen and that is aerobic respiration. Aerobic respiration is "the process of producing cellular energy involving oxygen." If we humans don't have oxygen then we won't be able to survive, but yeast will be able to survive with oxygen and that's a process called anaerobic respiration. It's a metabolic trick yeast does which obtain energy from sugar, this process is also known as fermentation. There are two byproducts that are made from yeast fermentation and they are ethanol (alcohol) and carbon dioxide (bubbles). Looking Inward: Did you get desirable results? I don't think we got desirable results because the yeast was inactive so nothing carbonated and the root beer was insanely sweet. Even though it didn't work out very well we still gave some of the soda to our class mates and teachers so they could give it a taste. I think I performed very well in this activity, I did what I could to help out and I also started the proposal document and worked on it with Savreen and Elyse. Looking Outward: Collaboration and Impact For the experiment I worked with Savreen and Elyse, and I think we worked really well together I had never worked with Elyse before so it was cool to work with someone new. We all contributed to this project and we were really good on staying on task when we needed to get work done, since Elyse had done this before it was really helpful working with her. She had all of the materials we needed so we didn't have to worry about that which was nice. I worked on the proposal alongside Savreen and Elyse, I also helped pour and mix our ingredients, and I was the very first person to try our soda which was really scary because I didn't know how it was going to taste. Looking Forward: What's Next? If I could do this lab again I would want to have better yeast so our soda would actually be carbonated, I would also want to know more about fermentation and yeast before I started. Even though we worked on the proposal and I knew a little bit about what was going on, on a molecular level I wish I knew more. I would for sure work with Savreen and Elyse again, we all get along really well, and we were able to get work done while having fun which always makes everything more enjoyable. There are a few ways we can continue on with this experiment, we could try to make soda again, and we could also look more into yeast and maybe make something else with it like bread. Takeaway: Summary Once we got our proposal signed off, and we had finished some background research we got to work on the actual making of the soda. We started off by dissolving some yeast in a warm cup of water, then in a gallon container we mixed soda extract, sugar, dissolved yeast, and filled the rest of the container up with water. Then we shook up the gallon container a bunch until all of the sugar had dissolved, which took a while because the container was really heavy. Once everything was all shaken up we put the liquid into two separate bottles, and let that sit for six days. After six days we went and opened up both of the bottles the mixture had been in, and it smelled kind of funny. I was scared to try it because it smelled like yeast and at this point we realized it wasn't carbonated at all, but when I tried it wasn't too bad, just really sweet. Looking Back: What Happened? Making bismuth crystals was a very long, grueling process, you have to let your crystals form by taking them off the heat. If you let them sit for too long they'll harden, and you'll have to restart the entire process by remelting the bismuth. This happened to Savreen and I about nine times within a span of three days, we couldn't get it right, but eventually we got the crystals out of the pan and were successful. When we pulled the crystal out of the pan it was in a weird shape and it didn't look like everyone else's but we made it work and it is now a necklace. Looking Beyond: What's the science? I had seen people in my class make bismuth crystals so I was really interested in trying it myself. The only problem was I knew nothing about bismuth crystals or bismuth at all, so the very first thing I did was look into what bismuth is. Bismuth is a metal that is very brittle, making breaking bismuth into small pieces not difficult, it also has a low melting point of 519 degrees Fahrenheit. Bismuth is naturally diamagnetic, and is actually the most natural metal to be so, diamagnetic is when a body or substance is magnetized in a 180 degree direction that's applied to the magnetic field. Diamagnetic substances have atoms that are matched with only alike electrons, paramagnetic atoms are matched with at least one different electron. Once I knew more about bismuth I wanted to learn more about why bismuth crystals look so pretty. I discovered that the reason why bismuth turns pink and purple is because, once the crystals come into contact with air the surface oxidizes, making bismuth crystals look the way they do. (Below is a diagram of paramagnet vs. diamagnet) 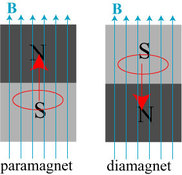 Looking Inward: Did you get desirable results? I think our results were okay, I really wanted to make a super nice crystal that I would want to actually wear on a necklace. Our crystal is in a weird shape but overall it still looks really cool, and I love all of the colors it's just not a necklace I would wear. I think the reason we got okay results is because we would always let the bismuth cool down for too long, that would always make the crystals stick to the bottom of the pan. Another reason why I think we got okay results is because we had messed up so many times that we had to keep on re melting and re melting, so I was very tired of having to do the same thing over again. I think I performed well in this activity, all of the materials were given to us, but I worked on the proposal and watched a little video on someone else's experience making bismuth crystals. Looking Outward: Collaboration and Impact For this lab I worked with Savreen, and I think we worked great together, we both came into this lab prepared and ready to work. We communicate well with each other, and while we were waiting for the bismuth to melt we would joke around making the wait and process more enjoyable. What I contributed to the group was I started the proposal and I worked on that alongside Savreen, I also watched YouTube videos of people making crystals so I had an idea of what we would have to do. Looking Forward: What's Next? If I were to do this lab again I would take the crystals out at the perfect time, so they would be the right shape and not hardened and weird looking. I would also try to stay more patient, because after the fifth time I was so tired of melting bismuth over and over and getting no results. I would also like to get help from someone who's successfully melted bismuth before, because I feel like they would be able to help us get better results early on. I will for sure be working with Savreen on more projects in the future, because even though we were mad about the bismuth not working, we were able to make jokes about everything and just have a laugh. A few ways we can continue on this project is by trying to make bismuth crystals again until they meet our goal, and we could melt other metals and compare them to bismuth. Takeaway: Summary Once we got approved we made sure the hot plate wasn't in use, then we gathered all of the materials we needed along with our safety wear which was a lab coat, googles, and gloves. Then we got a metal pan and filled it with bismuth and put it on the hot plate, after waiting for around ten minutes or the bismuth was ready to be taken of the hot plate. We made sure to scrape of the residue that was sitting at the top of the now liquid bismuth, then we let it sit making sure to tap the sides. If you tap the sides and there are a lot of ripples that means the bismuth isn't ready, if you tap the sides and there are only a few ripples and you can see some crystals forming at the top then you're ready. We got an empty metal pan and poured the liquid that was surrounding the crystals into the empty pan, and picked out the crystals with pliers. Looking Back: What Happened?
For this lab I worked with Savreen and we made bouncy balls, I've never trued to make a bouncy ball and I didn't think we would be able to make one with household materials, but I was excited to test it out. Once we started making the ball we weren't sure it would work, we were almost positive it wasn't going to work, and we were sort of proved wrong. It was very difficult to get the right shape of the ball but when we finally got it somewhat circular we were very excited. The bouncy balls themselves didn't work too well, they didn't really bounce which was a little disappointing. Looking Beyond: What's the science? There is a chemical reaction taking place, and it’s between the borax and the glue. The borax acts like a “cross-linker” with the glue because of the polymer molecules, this means that when you lift the bouncy ball it will all stay together. Glue is made up of polymer which is a long chain of molecules, so when you add borax to the glue the polymers stick together like a net. The cornstarch makes it so all of the ingredients stick together so the ball will keep its shape. Looking Inward: Did you get desirable results? I think the results we got were okay, the ball didn't want to hold its shape so we had to keep on adding glue to the places that weren't sticking. Once we had finished molding it and our bouncy balls were in the shape we wanted, we let them dry for a little bit before picking them up and bouncing them. We soon discovered that they didn't bounce very high, and after every bounce the ball started to break apart. I think the reason why our bouncy ball didn't work very well is because we didn't mix all of the ingredients together very well, the cornstarch borax mixture didn't want to mix with the glue, so we tried our hardest but we didn't get the results we needed. I think I performed well in this activity, I did everything I could to make a good bouncy ball, and they weren't half bad so I think that's a success. Looking Outward: Collaboration and Impact I worked with Savreen on this lab, and I think we worked really well together, so far I've worked with her on every lab so I'm very familiar of her work habits. I think that we both get work done and are very hard working which is why we always work together. I contributed to this lab by working on the proposal alongside Savreen and when we didn't have one of the materials available to us I went all around the school to find it. Looking Forward: What's Next? If I were to do this lab again I would really mix everything together very well to make sure the bouncy ball stays together. I would also make sure I know where all of the materials are the day before so I'm not frantically running around looking for things. I will definitely be working with Savreen again in the future, because we work really well together and I know I can depend on her to actually work and get things done. I also want to do more labs with Genevie and Morgan because I also really enjoy working with them. I don't think there's anyway to continue this experiment unless I were to try it again to see if I can get better results, which I don't see myself doing Takeaway: Summary After the proposal was typed up and we gathered all of our materials, we went outside to start this messy process. There were two separate containers one of them had warm water, cornstarch, and borax, that mixture was then mixed until thoroughly combined, in another container there was glue and food coloring. Then we poured the glue into the bowl with all of our other ingredients, after that we tried to mix everything together. There was a big glob in the bowl now so we took that out and cut that in half and we each made one ball, rolling it in the palms of our hands. After rolling the glob for a very long time we eventually started to see the shape of a ball, at this point the ball was falling apart so we added glue into the cracks. The glue helped it stick together and once we both liked the shape we had we let the ball dry a bit, then we started bouncing! Looking Back: What Happened? For this experiment we made magic sand, none of us had ever done anything like this before, so I knew it would be an interesting but educational process. Magic sand is sand that doesn't get wet, when it touches water it's supposed to bond together and stay dry. We tested our magic sand by putting it on a spoon and dipping it in water, and it worked for the most part with only a few grains of sand falling to the bottom. Then we decided to test our magic sand with a bigger scale, so we added all of our sand into a measuring cup filled with water to see if this would work. When we did this our sand wasn't so magical and it was all soaking wet. Looking Beyond: What's the science? Before we did this lab I had no idea what magic sand was, so I was really excited to do this experiment because I have never heard of a sand that doesn't get wet. In order to do this lab we had to know the science behind it and learn what was actually going on, and why the sand doesn't get wet. After doing some research I learned that the reason why magic sand doesn't get wet is because it's coated with a hydrophobic compound, which means a compound that doesn't like water an example of this is oil. The hydrophobic compound we used was scotchgard, what that did was cause each grain of sand to cling to each other and form cylinders when exposed to water, which also reduces its surface area. Once the magic sand leaves water it is supposed to come out completely dry, just like normal sand. Looking Inward: Did you get desirable results? I think our results were okay, yes the could have definitely been better but I think it was a good learning process. When we tested small amounts of time it worked for the most part only small grains of sand separating from the dry clump, so that wasn't a complete fail. When we tested all of our sand together it did not work at all, all of the sand got wet and none of it clumped together at all, everything fell to the bottom. I think the reason why we did not get the results we had hoped for was because we did add enough scotchgard which was our hydrophobic compound. We were all being very cautious and we did want to use too much, but I think we should have used a lot more then we did. I also think not mixing the sand well enough contributed to the results we got, in order for magic sand to work you really have to coat every grain of sand which we didn't do. Looking Outward: Collaboration and Impact I worked with Savreen, Morgan, and Genevie during this lab, I had never worked with Genevie before so it was cool to work with someone new, and I had only worked with Morgan once so that was fun as well. I think we all worked very well together, we made sure to separate all of the work we needed to do evenly. All of us contributed when it came to making the proposal, and we all took turns spraying the scotchgard and mixing the sand, Looking Forward: What's Next? If I were to do this experiment again, I would make sure we add a lot of scotchgard and mix the sand up really well so we can get the best results. I would work with Savreen, Genevie, and Morgan again because it was a lot of fun doing the lab and we all had a really good time. We are all hard workers as well so there was never a time when one of us was slacking off, we were all constantly working in order to get what we needed done. I don't think there's many ways to continue this experiment, we could possibly try this again to get better results, and we could maybe try to make something else with sand. Takeaway: Summary The very first thing we did was write the proposal, once we did that and got it checked off by Andrew, we got all of the materials we needed which luckily we didn't have to go far to get. Once we had all of our safety gear on, we put sand in a container and started spraying it with scotchgard. After every few sprays we would mix the sand and spray again, once that was done let it dry, then tested it, and it was a semi success. Looking Back: What Happened? I think this experiment worked out really well, we got our desired results which was good ice cream, and we were able to learn about the science behind it as well. I've only made ice cream once and that was in fifth grade in a bag, so I wasn't sure how it was going to turn out and I was pleasantly surprised. Since none of us have ever made ice cream with an actual machine I thought we would struggle with how to use the machine, but we figured it out by making sure we looked at all of the pieces a day before. Looking Beyond: What's the Science? Even though the reason why we wanted to do this experiment was to make some homemade ice cream, I really enjoyed learning about the science and why ice cream turns out the way it does. Whenever I learn about the science in food it makes me appreciate the process more, and so now whenever I eat ice cream I think about how all of the ingredients play a key role in how it turns out. The milk in the ice cream adds fat, and richness it also balances the base mix, improves the density, smooths out the texture and overall give it a better taste. The sugars or syrups that are added to ice cream not only sweeten the taste but they also help refine the texture and body. The sweeteners also drop the freezing point of the mixture making it so the ice cream doesn't become one hard brick, they build the stability of the ice cream. The water content in the mix is the reason why the ice in ice cream is apart of the name, it starts to freeze making the ice cream solid and making its body. Looking Inward: Did you get desirable results? Yes I feel like we got desirable results, because we made really good ice cream from scratch. I think the reason why we got the results we wanted was because we all worked together as a team. I helped us get these results by bringing in some of the materials that were needed, I also suggested we take a look at the machine and the pieces so we wouldn't have to worry about that the day of. Looking Outward: Collaboration and Impact For this lab I worked with Savreen and Morgan and I think that we worked really well together, since we're all friends we know each other's strengths and weaknesses. That is one of the positives of working with your friends, you know that they are actually going to get work done instead of goofing off the whole time, and if they get off task you're not afraid to tell them something. One thing that we could've done differently is have the materials ready a day before because, the day of our lab we had to run out to Vons to get ingredients which was a little stressful. Looking Forward: What's Next? I think if I were to do this project again, I would want to have all of the materials the day before or at least the morning of because when we got to Andrew's class we had none of the ingredients we needed. That was kind of stressful, especially when we were at Vons and we weren't sure if they had any whipping cream in stock which is a very important component in ice cream. I feel like I work well with Savreen and Morgan, we all contributed in some way and it was fun doing this project with them. There aren't many ways we can continue this experiment, one way we can is by making ice cream in a bag, and comparing the process and the results. Takeaway: Summary Before we even started gathering the materials we needed or making a plan we looked up a little bit about the science behind ice cream, so we knew what was actually going on, on a molecular level. After we did that we started the actual process of making the ice cream, we mixed all of the liquid ingredients together, then we mixed in the sugar until it dissolved. Since we had an ice cream maker available to us we set that up and then poured our mixture into the opening, before we could add in the cookies we had to let the mix thicken up a bit. After it had thickened to the right consistency which is when the ice cream should be almost done we added the cookies and let them mix in. Once everything was done we ate our final product and even shared it with our classmates. Looking Back: What Happened?
For this project our goal was to put out a burning candle using CO2, we got the CO2 by mixing baking soda and vinegar because when you do that it emits CO2. The experiment worked out well, the problem is it took a while for us to finally get our desired results but eventually we got it. Looking Beyond: What's the science? In order to extinguish the candle you have to make CO2, we got that by mixing baking soda and vinegar. The reason why the carbon dioxide does this is because it's heavier than air, which makes it sit in the bottom of the glass. The carbon dioxide sinks and replaces the air that's around the candle exchanging it with carbon dioxide, which suffocates the flame causing it to extinguish. Looking Inward: Did you get desirable results? Yes we did get desirable results, it took a while but we eventually extinguished the candle. I think the reason we got the results we wanted was because we had a lot of patience, we tried about four times before it worked, then Andrew came and it worked for him on his first try. Then we tried like three more times and it finally worked which was really cool, the reason why it took us a while was because we took too long to pour the carbon dioxide so it had already gone into the air. Looking Outward: Collaboration and Impact For this project I worked with Savreen, Autrina, and Evan. It was cool to work with different people and we all get along really well so there wasn't any conflict. We all worked together to find the materials we needed, and when it came to pouring the CO2 we each gave it a go until we could make it happen. I helped with mixing the materials, and I also was the first person other than Andrew to actually make the experiment work. Looking Forward: What's next? There's not much we can do to continue this project because it was a one time thing, if anything we might be able to do more with baking soda and vinegar to learn more about carbon dioxide. There are also projects about other gasses that can be done to learn about more gasses as well. Takeaways: Summary We started off with getting all of the materials needed, which was just baking soda, vinegar, beaker, candle, and a lighter. After we got all of the materials we lit the candle with the lighter and then we poured some baking soda and vinegar in the beaker and quickly tried pouring the gas over the flame. Like I mentioned before it took us multiple tries to actually get this to work but when it did it was very exciting. |
AuthorWrite something about yourself. No need to be fancy, just an overview. Archives
December 2015
Categories |
 RSS Feed
