|
Add a link or discuss your favorite thing/blog post/etc.
Why did you choose this? My favorite thing I've done this semester is make chocolate chip muffins. The reason this is my favorite thing is because Savreen and I had such a fun time making them, and that was also the first time I really looked at the science in food. It was definitely a learning process, especially when we almost started a fire, even though that was a scary thing that happened, when we talk about it now we laugh about it. Not only was it fun, but I feel like that was a very strong blog post, and the end result was amazing. When were you most curious? I feel like I was most curious when we were planning out our sections, there were so many things that I wanted to do, that I didn't get the chance to. When Andrew told us we could do any experiment that we wanted, I immediately had like twenty ideas in mind. I was also very curious while making bath bombs, because even though I had done the lab before I never really looked at the science behind it. I always found it interesting how they are able to fizz up whenever water touches it, and learning about it on a molecular level was interesting. When were you least curious? I was least curious during the rocket project, especially when we had to learn about and design motors. Before we could design our own motors, we had to research the different types of cores and fuel. The main problem with this phase of the project is that, there weren't very many websites that had a lot of information on what we needed to be researching. I also wasn't very curious during the actual construction of the rocket, because I don't really find rocketry interesting. If you like learning about rockets and motors, then this will be a really fun project for you, since I wasn't it was hard finishing this project. How has this semester helped you for next and beyond? This semester has helped me a lot when it comes to reflecting, I had a physics blog last year and whenever I had to write a blog post, I never went into detail. I always wrote what was happening, never my thoughts and experiences, I also never talked about what science I was learning. Time management is something I've always had trouble with, this made getting 250 points very difficult in the beginning of the semester. In order to get all of the points necessary, I really had to stay on my A game, this meant I had to plan out what I was going to do, and stick with it. I had to make sure I was staying focused, and not wasting my time during class. When I did waste my time I spent my weekends trying to catch up on what I should have been doing during the week. Give a few last words. A message to my future students.. A bit of wisdom you'd like to share.. Overall this semester was really fun, most of the time you get to plan and choose what projects you're doing, so make sure you take advantage of that. Even though I'm excited to learn a new language, I'm going to miss doing experiments, and hearing Andrew's crazy stories. If you're in Andrew's class, make sure you ask him to tell you the story about his friend Meat on Halloween. One thing I really struggled with this semester was updating my blog, for almost every single section I didn't have a single blog post up until halfway through the last week. Even now, I've spent about three days of my winter break trying to finish blog reporting, because I' waited until the last minute. Another piece of advice I have for Andrew's future students is to bring a jacket, for some reason the chemistry classroom is always freezing. One day we walked in, and it was 50 degrees in there, so if you get cold easily like me, bring a jacket you'll regret it if you don't. I would also recommend making sure you finish every lab you want to do, I really wanted to make soap and candles, but sadly I didn't get to, and I really regret not making them. Plastic is truly a remarkable thing, it can be used to make spaceships, replace bones, we can make plastic bags that weigh as much as a nickel but hold up to eight kilograms. Plastic also unlike many other materials, doesn't rust or rot, and can last for centuries even though most of the time we don't need it for that long. Something I learned from this video is 10% of our plastic waste ends up in the ocean, the big pieces of plastic in the ocean end up forming into tiny little pieces from the suns heat rays. Even though the pieces of plastic are tiny they are still just as durable, making them very hard to get rid of, so they end up spreading out. This is very bad because then bigger species end up thinking the plastic is food, then they die, also bacteria forms on the plastic hurting the sea animals around them. The small pieces of plastic are homes to harmful microorganisms, so when one animal eats it, and another animal eats that one, the harmful organisms are being passed throughout the food chain. The significance of this video is, this is a huge problem that we haven’t been paying much attention to, we depend on the ocean for a lot of things and all we are doing is polluting it. This is killing the sea animals that many people hurt, making them toxic. A question I have now is, what can we do? There is already so much plastic in every single ocean, is there any way we can get reverse the effects of the problem we have caused? This video was made by MinuteEarth, if you would like to watch it, it is down below. In order to learn about the physics of car crashes, first we need to learn a little bit about cars and how they work. Most of the time, cars are powered with gasoline, and per liter of gasoline there are about 56 mega joules. Cars take that gasoline and burn it creating chemical energy, which then converts to kinetic energy of motion to the car, but around 80% of the gasoline is lost in the engine. That still leaves us with around 20%, which may not seem like much, but only five teaspoons of gas are needed to accelerate a two ton car, 60 kilometers per hour, plus 1/3 of a cup more to keep the car going at that speed. When a car needs to stop, all of that energy needs to go somewhere, when the brakes are used, the energy is dispersed by heating up, or the energy can be dispersed by the crumpling of metal from the car. Cars were designed to scrunch up when they crash, because that lengthens the span of the car crash so stopping your vehicle doesn't as an intense acceleration. When you have a lot of acceleration in a small time period, and you get in a crash it's very bad for your brain and organs, but cars only have about 50 cm of crumple space. This means that while the car is being squashed, there still needs to be 60 tons of force. The bumpers in the front of the car are designed to take about half of the force from a car crash. I found this video very interesting, but there was a lot going on, so while writing this I had to keep on going back in the video, to make sure I got everything. Overall I learned a lot about cars, which is a topic I've never been very knowledgeable in. A question I have is if you give cars 10 cm of crumple space, would that take all of the force from a crash? It seems like that would be the case, and if so why don't we give cars more crumple space? This video was made by MinutePhysics, if you would like to watch it, it's down below. Looking Back: What Happened? For this lab I worked with Savreen, Evan, and Mayra. We made chocolate chip cookies, but the main purpose of doing this experiment was to test two different cookie dough's. One of the cookie dough's spent 24 hours in a fridge, the other dough was baked right after we had made it. The cookies ended up tasting really good, and as predicted the cookie dough that spent 24 hours in the fridge tasted better. Looking Beyond: What's the Science? I have done quite a few labs that involve food, so I was aware of the science that was happening. Each ingredient plays an important role in how the cookies turn out, and it was interesting to learn more about that. Butter: When you mix water with flour, it forms gluten and since gluten can't form in fat the butter used hinders the gluten formation, which then makes the cookies more tender. Butter also gives the most flavor in the cookie, butter is 3 to 5% milk protein, 15% water, and 80 to 83% butterfat. The proteins in the butter browns during the baking process, which affects the cookies final flavor. Egg Whites: There is no water added to cookie dough, the water is found in the egg whites, there is also protein found in this part of the egg. The protein in the egg whites holds on to the water vapor. Egg Yolks: Protein and moisture is also provided through the yolks, but they mainly bring a nicely emulsified source of fat. White Sugar: This type of sugar is a crystallized sucrose, or a disaccharide which is when two sugars are combined, and a water molecule is removed. In white sugar fructose and glucose are the two sugar molecules being combined. Brown Sugar: This sugar is mostly crystallized sucrose, there are traces of minerals found along with fructose and glucose. The minerals affect its flavor, while also giving this sugar a slightly acidic pH. Baking Soda: Sodium Bicarbonate is all this is, which is also a base, or an alkaline powder. Baking soda reacts very quickly when dissolved in water, and mixed in with an acid. It then turns into carbon dioxide, sodium, and water. Flour: Gluten is formed when flour and water come in contact, flour also binds all of the ingredients used together. Letting your cookie dough rest, is the key to having the best tasting cookie. While the cookie is baking, the starches and the proteins in the flour break down and then combine, bringing all of the ingredients together. When you let your cookies rest, you're giving the deconstruction process more time, allowing the flavor to really develop. Looking Inward: Did you get desirable results? Yes, I think we got desirable results, making these cookies was a very long process and in order to get it done in the short amount of time we had, it required all of us to work together. When it came to making the cookie batters and baking them, we all stayed focused because we knew we had to get it done, but while they were baking that's when we knew we could have fun. I think I performed well during this lab. We all did our part, and made sure to equally contribute what we had to do. Looking Outward: Collaboration and Impact During this lab I worked with Evan, Mayra, and Savreen, and I think we performed very well. We all brought the ingredients we said we were going to bring, and while we were making the cookies we stayed focused when we had to. What I personally contributed is like I said before, I brought the materials I was in charge for, and I also took the lead while writing the proposal. At first we were just going to make cookies and I was the one who mentioned baking two different batches and testing the differences. Looking Forward: What Next? If I could do this lab, I would try to plan it on days we have more time. We were really rushed while doing this experiment, which was kind of stressful. Also, when we found this experiment online it said to let a batch of dough rest for two days, and since we didn't have enough time, our dough only rested for one dough. I would like to work with Evan, Mayra, and Savreen again, because usually in groups especially one of this size you have on or two people who don't do anything and that wasn't the case. I don't think there is a way to continue this experiment in particular, we could do another lab involving food, or maybe do this lab again, but other than that I don't think more can be done. Take Away: Summary The first thing we did was make a first dough, and let that sit in Mr. Aguirre's fridge until the next day. After 24 hours were up we went back to the staff kitchen and made another batch of dough, then we started baking those cookies. While they were baking we got the batch from the fridge and let them soften a little bit, because the dough was rock solid. Once the first dough was done baking we put all of those cookies in one container, and for fun we melted some chocolate and put it on eight cookies (each cookie was cut in half.) Then finally the second batch of cookies finished baking, and we put melted chocolate on eight of those cookies. Then in a separate container, we put those cookies inside, by the time we got to this point we were already in third period which is humanities, and no one told us, so we really started rushing. This is where things got really hectic, we went to the great room which is where many classrooms are located, and people came up to us asking for some cookies. The problem is a lot of people took cookies from one container and none from the other, then when we tried telling them something they were already gone. We still ended up getting a few people who actually participated in our experiment. Our final results were with no chocolate 3 people like cookie one, and 8 people liked cookie two, cookie two being the dough that was refrigerated. With chocolate 2 people liked cookie one, 3 people like cookie two. The final results ended up being like expected, majority of people like the cookie with the refrigerated dough. Here is a picture of our rocket, while we were waiting for the wood glue to finish drying on our fins. 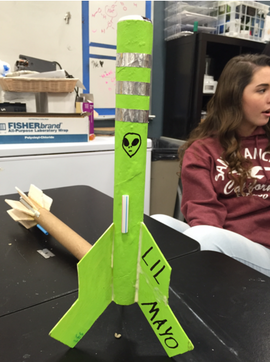 Here is a video of our rocket Lil Mayo being launched, the morning of Andrew asked us if we wanted an altimeter on it. Which is a small device that measures the altitude or how high, in this case our rocket went. Our rocket went up 512 feet, which is a lot higher than I expected it to go. That part of our launch went really well, but something that didn't go as well was the fact that our ejection cord didn't work. The ejection cord was what makes the parachute deploy, so since it didn't go off the parachute didn't deploy. This made our rocket land straight into the ground, our nose cone was smashed in, and the top part of the body tube had cracked. We were worried about the altimeter, because we thought it might have broken, luckily it wasn't. This was the best part of the project, seeing your final product and how it all works out. Even though our rocket didn't completely work, it was still fun seeing our final product being launched.
In order to have a visual representation of what we wanted our rocket to look like, we drew it out. After our drawing was finished we started the actual construction of our rocket. Nose Cone: At first our plan was to construct a nose cone out of balsa wood, but then Andrew brought PVC caps that perfectly fit on our rocket. So instead of building a nose cone we got to use the cap, which definitely made life easier. It was also the perfect weight our rocket needed, so we didn't have to glue anything inside of it, which was an added bonus.
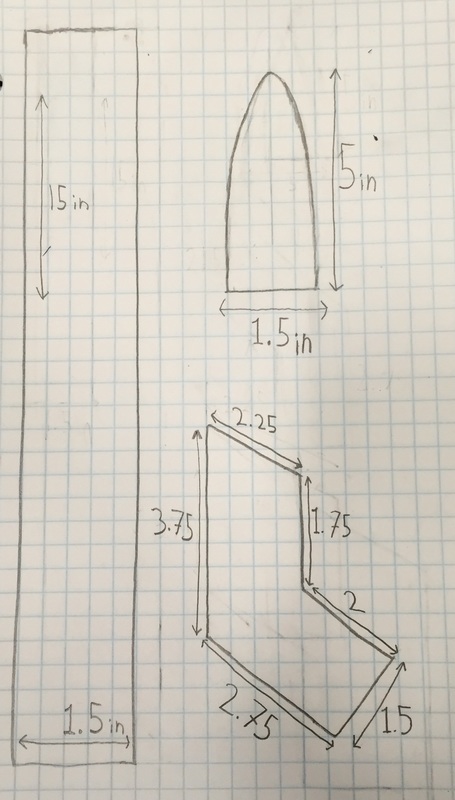
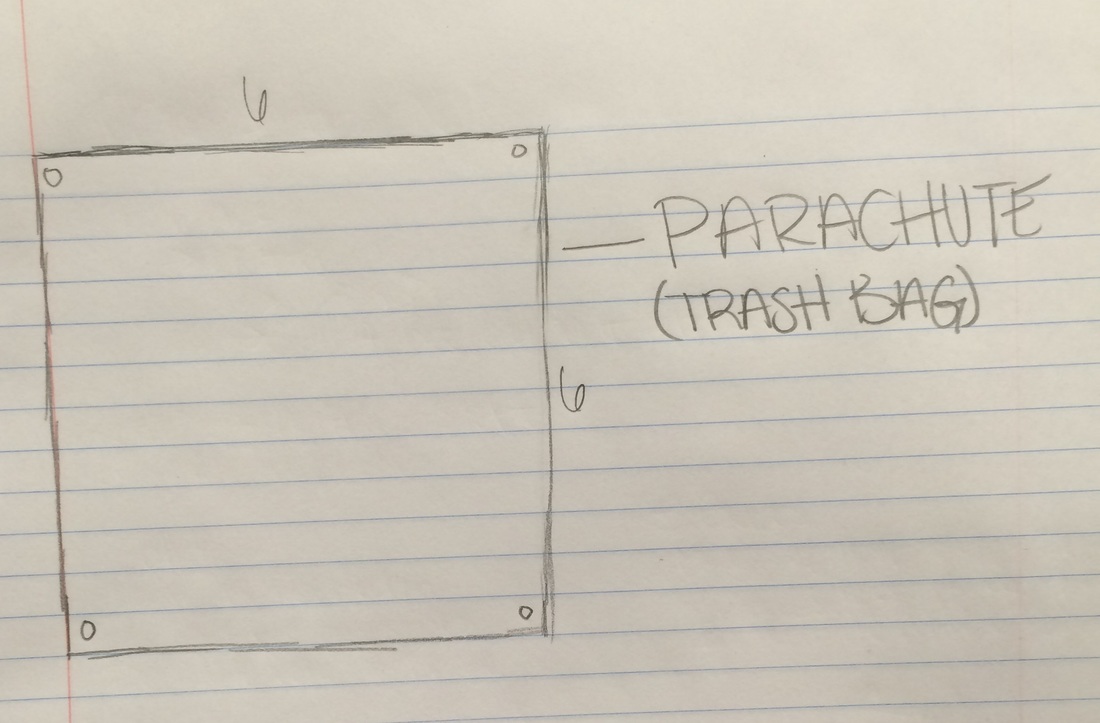
Body Tube: This was probably the hardest component to make, Gabe V. and Victor helped us with cutting out the strips and making sure it was the perfect length. They also taped down our very first layer, but after that Evan, Savreen, and I struggled a little bit. The hardest part was making sure the layers of paper where in their correct place and didn't slide off. Working with the wood glue got really messy, and by the end of this we were all covered in it. Our body tube turned out okay, we wanted to really glue down the seems, but it wasn't an even coat of glue, so our tube had quite a few bumps. We tried sanding the bumps down to make it even, but that really didn't do much. Before any of us started making our body tubes, Andrew did a demonstration in front of the entire class, and he without a doubt made it look a lot easier than it actually is. Our tube ended up being 12 inches, which was smaller than we originally wanted it to be, but it ended up being fine. Fins: The very first thing we had to do for our fins, was find the center or gravity and thrust. We found the center of gravity by tying a string to our rocket and spinning that around. There was a mock motor in our rocket to make sure the results were as accurate as possible. Once we found the center of gravity, we had our top and bottom, and the surface area had to be the same for both halves. Our fins ended up looking like the design on top, the surface area being 6.89 inches. The original plan of using four fins wasn't going to work because that meant the surface area on the bottom wouldn't be even to the surface area on the top. Luckily three fins would work perfectly, so that's how many we ended up using. Evan took the lead when making the fins, he got a piece of balsa wood, and drew the design of our fins on them. Then he took a pushpin and used that to push into the wood, then he got a razor cutter and pushed that into the wood. Before we glued the fins on we painted them along with our body tube. To make sure we glued the fins in the right place Phillippe showed us a picture online, we held our rocket up to that and drew the lines on our rocket. After the paint dried we used super glue, to make sure the fins would stay in place, then we used a small coat of wood glue on the edges. Parachute, Shock Cord, and Engine Housing: At first we wanted the parachute to be a square, but we made it in the shape of a circle, drawing it with a compass we made. We still made it out of a trash bag, and after we cut it out we put pieces of duct tape on four of the edges. Once that was done we used a hole puncher to make the four holes needed. After that we got fishing line that was cut in four even strips, and tied that in the holes. The duct tape was used to make sure when the rocket is launched the fishing line doesn't tear the trash bag. The fishing line was tied around shock cord, then the other end of the shock cord was super glued inside our rocket. This is so when our rocket launches, and our nose cone goes flying, the parachute will be deployed. For the engine housing, we didn't have to much, the size of our engine was perfect therefore it just slid right into our body tube. The only thing we needed for it was a metal clip, that came from a card stock folder, there was a small slit we cut into our body tube so the top part of our clip could be pushed in. If the top part of that clip was too long our motor wouldn't be able to fit in, so we made sure it was cut short enough, for our motor to fit. For the building of the rocket I am still working with Savreen, and Evan which has been a lot of fun, but none of us were really sure what we wanted our final rocket to look like. After sitting together and brainstorming we came up with some ideas, and here they are.
Nose Cone: Evan is the one who came up with what our nose cone should look like, he said he wanted it to be pointed and made out of balsa wood. We aren't completely sure how to make a nose cone out of balsa wood, but quite a few students in our class have experience with this, so luckily we can turn to to our peers for help. Body Tube: I was the one who came up with the idea for our body tube, last year when I made a rocket I made the body using paper cut into strips and gluing them together. We also considered using a paper towel role, but Andrew recommended we all make our own body tube because it will turn out better. After all of that I thought that we should make our own body tube, Evan and Savreen both agreed with me. I think that our body should be around 15 inches because the motor we are using is the Trident Missile and it produced a large amount of thrust. Fins: Once again none of us were really sure what we wanted our fins to look like. After taking some inspiration from Autrina, Isabelle, and Elyse, Savreen thought that it would be best for our fins to be a clipped parallelogram shape. Savreen also recommended we use four fins, and if that is too heavy switch to three. Parachute, Shock Cord and Engine Housing: For the shock cord, we are going to cut one from an old rocket. Our parachute will be made from a trash bag that has holes punched through. Andrew told us that since our motor will fit perfectly into our body tube we wouldn't need any engine housing, but we will need a metal clip, to make sure everything stays in place. 11/16 Monday- Make two week plan
11/17 Tuesday- Start planning out rocket 11/18 Wednesday- Continue planning rocket 11/19 Thursday- Gather materials for rocket 11/20 Friday- Start building rocket *Thanksgiving Break 11/23-11/27* 11/30 Monday- Build Rocket 12/1 Tuesday- Build Rocket 12/2 Wednesday- Build Rocket 12/3 Thursday- Build Rocket 12/4 Friday- Finish Rocket |
AuthorWrite something about yourself. No need to be fancy, just an overview. Archives
December 2015
Categories |
 RSS Feed
